How to use Remote Access?

Once your account is setup. Our Endpoint Manager will send account activation email to you. You can activate their account and set your own login password by clicking the link in the email. An example of mail is shown to the left: 

  • Upon activation, the you will be able to login to EM with your user-name and password. Log in at: https://canitan-msp.itsm-us1.comodo.com/ as shown in the mail link 

  • We have configured two-factor authentication, you will have to follow the on-screen instructions to set up this during login. 

Endpoint Manager will send device enrollment link to the user email. They can click to the link on the email to enroll your devices. 


  • Enter Your 2FA Code

  • After login, you can view the applied device to your remote environment 

  • You can view the enrolled devices here 

  • Select the devices to start the remote control 

Once you have connected it will look like this.

How to Use the Remote Manager Toolbar
• After connecting, you will see the desktop of the remote machine in the ITarian window.
• You can use the remote access toolbar to manage your connection.

  • Position – Click and drag the tool bar to your preferred location. 
  • Full Screen – The remote desktop will cover your entire
    display, without the operating system’s window-framing
    interface. 
  • Click the same icon to exit full screen mode


  • Pin – Lock the tool bar in place in full screen view.
    Minimize/Maximize – Show/hide tool bar options.

 
  • Actions – Send control commands to the endpoint.
 
  • Actions – Send control commands to the endpoint.
 
 
  •  Send Ctrl + Alt + Del – Opens the Windows
    security screen on the remote device. This lets
    you:
    • Lock the remote computer
    • Log the current user out of the remote
    machine
    • Change the password of the remote
    machine
    • View task manager on the remote machine

Enable Push Notifications for Hikvision based NVR

1.Download Guarding Vision onto your phone or device.
2.Register an account.

3.In the guarding vision tab in the top right corner hit the + and manual adding

4.Adding Type: Guarding Vision Domain
   Serial No: Your Serial Number
   Hit the save icon in the upper right once finished

5.To enable push notifications on the Guarding Vision tab swipe left on the device hit the gear icon this will take you into the nvr setting and from here enabling alarm

6.To select which cameras are notification enabled go into the nvr settings as above and go into linked cameras.
Hitting the eye icons toggles setting
closed= notification disabled
open=notifications enabled

7.Under the more tab located at the bottom of the screen click into settings to make sure Message Push Notificatins are ON

Your devices should now be sending you notifications.

How do I submit a support request?

How do I submit a support request?

Phone

All Support Requests should be submitted through the Office at 512-272-6106. This ensures that you will receive the fastest possible support.

Submitting requests to individual technicians may delay your support request. Technicians may be on-site or out of the office.

E-Mail

All Support Requests via email should be directed to support@canitan.com.

Support Requests should include the following:
  • Name:
  • Company:
  • Who should we contact:
  • Contact Phone Number:
  • Problem Description:
  • Priority Level (1-Emergency – 5 – Low): 
  • When should this be done by?:
 
 
Submitting requests to individual technicians may delay your support request. Technicians may be on-site or out of the office. If a request is direct to a support specialist please CC support@canitan.com.

How to add a new user to your alarm system through Alarm.com

How to add a new user to your alarm system through Alarm.com

Other Recent How to's

Happy Easter

 Decker United Methodist Church Nathan Smith Happy Easter 2024 This time of year is a time of New Beginnings. Fall has ended and life is

Read More »

Happy Independance Day

Happy Independence Day! As we celebrate the spirit of independence, we wanted to take a moment to express our gratitude and appreciation for your unwavering

Read More »

Turing Vision – How To Videos

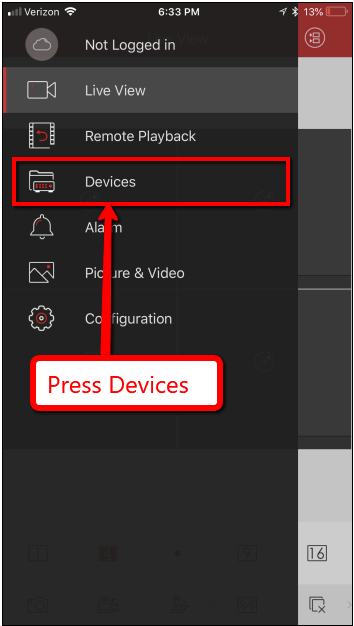
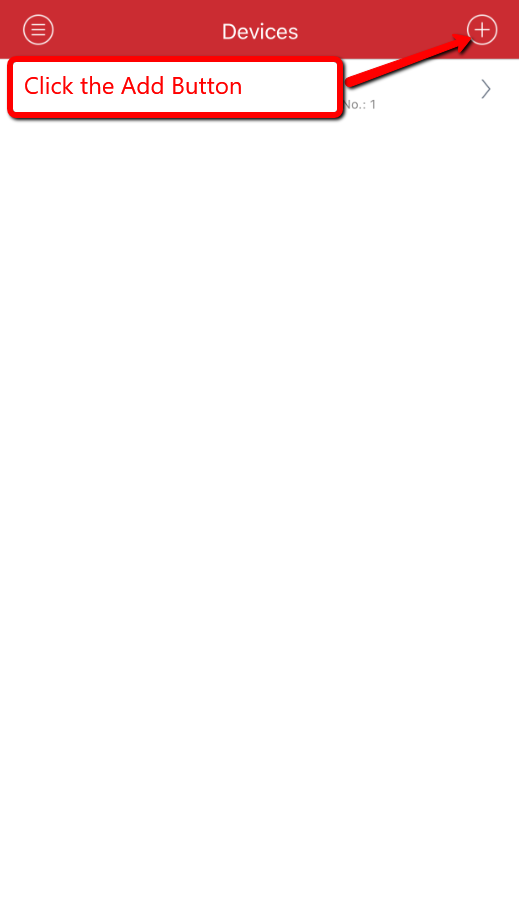
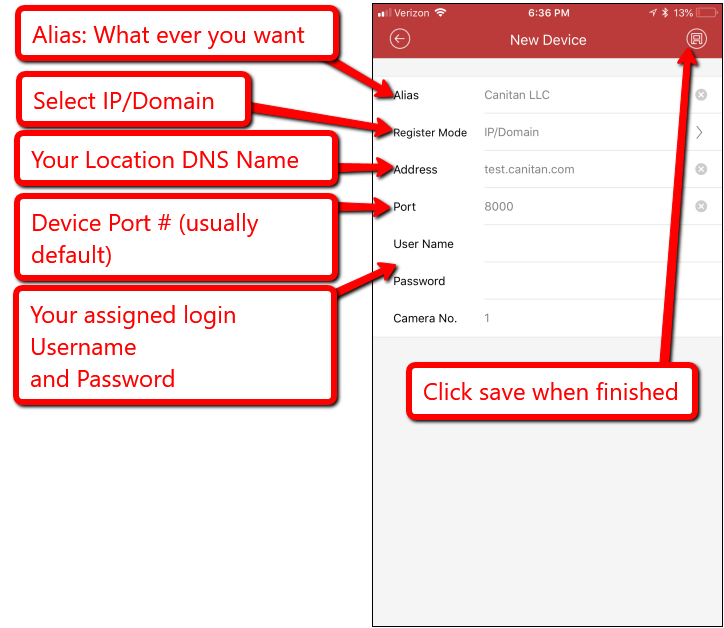
CanitanTuring Smart Cameras Turing Camera Systems Turing Smart Camera Instructional Videos Turing AI provides a comprehensive platform with award winning AI algorithms that connects with

Read More »

CCTV vs Cloud Cameras

CCTV VS Cloud Cameras CCTV vs Cloud Closed Circuit Television (CCTV) cameras have been a popular choice for businesses and homes for many years, and

Read More »

Setup Office 365 in Outlook on Android

Step 1
greyline
Open the Outlook for Androidapp. The icon looks like this:

Outlook for Android

If you don’t have it yet, download Outlook for Androidfrom the Google Play Store.

Note: See www.products.office.com for more information and minimum requirements.

Step 2
greyline
Tap Get Started if it’s your first time.

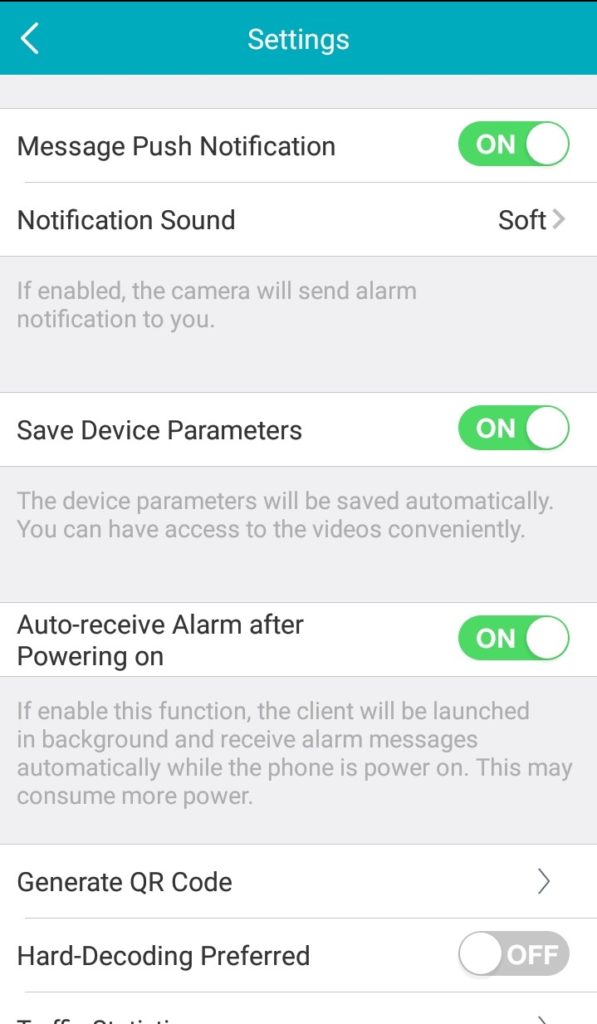
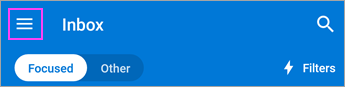
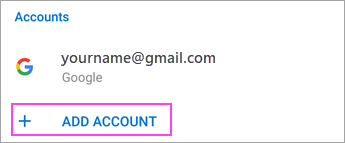
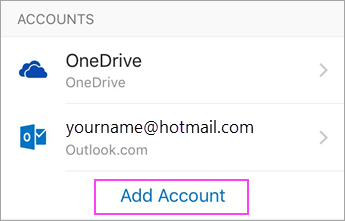
Otherwise, open the Menu and tap Settings > Add Account >Add Email Account.

Tap and open the menu.

Go to Settings

Select Add Account

Step 3
greyline
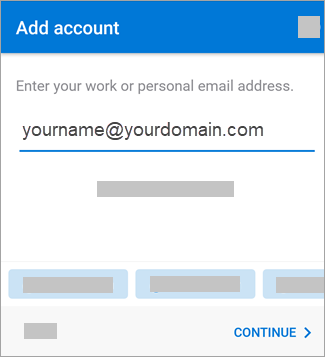
Enter your full email address, then tap Continue.

Note: If you’re asked to choose your provider, you’ll have to Set up your Exchange manually or set up an IMAP or POP account.

Enter your email address.

Step 4
greyline
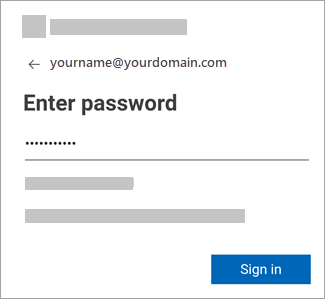
Enter your email account password and tap Sign In or Next.

Note: The sign in screen may look different for you depending on your email provider.

Enter your password for your email account.

Step 5
greyline
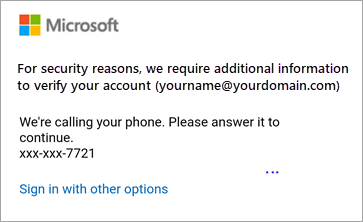
If 2-step verification is enabled, verify yourself using the method you set up (6 digit code, phone call, or Microsoft Authenticator app).

Note: If you’re prompted to Set up 2-step verification for Office 365, it may be required by your IT admin.

Check your text messages and enter the 6 digit code.

Step 6
greyline
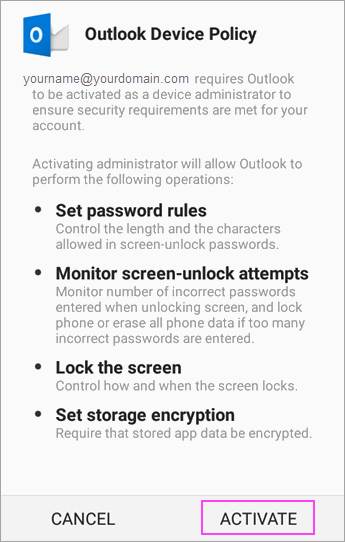
If your IT admin has set additional policies, tap Activateand Activate again. Outlook may also request permission to access your calendar, contacts, etc. Tap Yes or Allow.

Tap Activate to accept your admin device policy.

Setup Office 365 in Outlook on iOS

Step 1
greyline
Open Outlook for iOS. The icon looks like this:

iOS Outlook app

If you don’t have it yet, download it from the Apple Store.

Note:  Available for iOS devices using iOS 10.0 or higher.

Step 2
greyline
First time using Outlook for iOS? Just tap Get Started.

If not, tap the menu icon the upper left corner.

Tap to open the collapsable menu in the corner

Tap Settings Outlook app settings > Add Account > Add Email Account.

Tap Add Account

Step 3
greyline
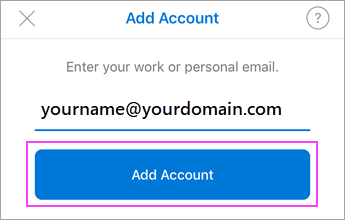
Type your full email address, then tap Add Account.

Note: If you’re asked to select your email provider, you may have to set up your email account manually using Exchange or IMAP/POP.

Enter your email address

Step 4
greyline
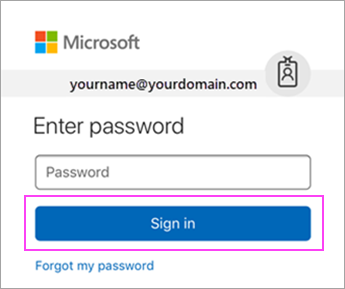
Enter your email account password and tap Sign In.

Note: The sign in screen may look different for you depending on your email provider.

Enter your Outlook.com password

Step 5
greyline
If 2-step verification for Office 365 is enabled, verify yourself using the method you set up (6 digit code, phone call, or using the Microsoft Authenticator app.

Check your text messages and enter the 6 digit code.

Step 6
greyline
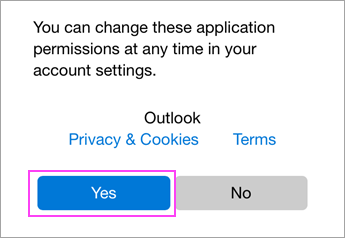
Tap Yes or Allow to give Outlook permission to sync calendar, contacts, etc.

Allow permissions.

Swipe through the intro and you’re now ready to use Outlook for iOS!

Setting up Hikvision App on iPhone

1. Click below to Install the Hikvision iVMS-4500 app.

iPhone

iPad

When the install is complete open the App

2 . Select America USA as your region and press enter

3. Accept Permissions

4. Press the menu button

5. Press Devices

6. Press Add Devices

7. Fill in required information and click save when done.

Your Cameras should now show up on your screen. If you have any questions or problems please give us a call @ 512-272-6106